
机组销售:0574-26871589
配件销售:0574-26886646
维修热线:0574-26871569
传 真:0574-26892499
地 址:宁波戚家山联合路246-252号
Perkins1204e-e44tta和1206e-e66ta燃油电磁阀诊断维维修故障码
发布时间2016/5/21 16:24:27
Perkins1204e-e44tta和1206e-e66ta燃油电磁阀诊断维维修故障码
电磁阀系统试验维修操作说明
|
J1939 代码 |
故障代码解释 |
故障原因分析 |
|
1076-5 |
发动机燃油喷射 泵燃油控制阀 :电流低于正常值 |
电子控制模块(电子控制单元)检测以下条件: 一种低电流条件下的输出,从电解加工的电磁吸力 控制阀0.6秒 有没有积极的168诊断代码。 该电解加工已供电至少0.25秒。 如果配备,警告灯将出现。细胞外基质将记录诊断代码。 此诊断代码检测到该控制电路中的电磁线圈故障 最有可能是一个开放电路的阀门。 |
|
1076-6 |
发动机燃油喷射 泵燃油控制阀 :电流高于正常 |
电解加工检测下列条件: 从电解加工到电磁线圈的高电流条件 控制阀0.6秒 有没有积极的168诊断代码。 该电解加工已供电至少0.25秒。 如果配备,警告灯将出现。细胞外基质将记录诊断代码。 此诊断代码将检测到该控制电路中的电磁线圈故障 阀。这个问题最有可能是由一个高边的短接地或一个 低边短。 |
|
1188-5 |
发动机涡轮增压器 1旁通阀驱动: 电流低于正常值 |
电解加工检测下列条件: 低电流条件下输出从ECM的电磁阀的旁通阀 调节器 有没有积极的168诊断代码。 该电解加工已供电至少2秒。 如果配备,警告灯将一次诊断代码已被激活 30秒。诊断代码将被记录。 发动机将被降级,这是积极的诊断代码。在引擎之后 被降级的,电子服务工具将显示“涡轮保护减免活动”。 这个诊断代码将在电路检测故障在放气电磁阀 极有可能是一个断路器。 |
|
1188-6 |
发动机涡轮增压器 1旁通阀驱动: 电流高于正常 |
电解加工检测下列条件: 高电流条件下输出从ECM在旁通电磁阀 调节器 有没有积极的168诊断代码。 该电解加工已供电至少2秒。 如果配备,警告灯将一次诊断代码已被激活 30秒。诊断代码将被记录。 发动机将被降级,这是积极的诊断代码。在引擎之后 被降级的,电子服务工具将显示“涡轮保护减免活动”。 这个诊断代码将在电路检测故障在放气电磁阀 调节器。这个问题最有可能是由一个高边的短接地或一个 低边短。 |
Perkins1204e-e44tta和1206e-e66ta电子控制废气旁通阀
Perkins1204e-e44tta和1206e-e66ta用电子方式有涡轮增压器控制废气旁通阀。通常,该旁通阀是于涡轮增压器的机械阀为了调节进气歧管压力
一组值。
电控系统的控制系统旁通阀精确调节进气歧管采用旁通阀调节器来控制压力该旁通阀。
所需的进气歧管压力计算被包含在电子对抗中的软件。这个ECM采用旁通阀调节器控制旁通阀以提供精确值进气歧管压力。电磁线圈旁通阀的调节是通过一个PWM信号控制从电解加工。
高压燃油的吸气控制阀泵:
高压燃油泵配有一个吸气控制阀。吸气控制阀精确地控制进入的燃料量高压燃油泵。
计算所需的燃料量被包含在电子对抗中的软件。这个在吸气控制阀内的电磁阀控制脉宽调制信号。
Perkins1204e-e44tta和1206e-e66ta电磁阀示意图

该Perkins1204e-e44tta和1206e-e66ta电磁阀引脚的位置在P2连接器位置图
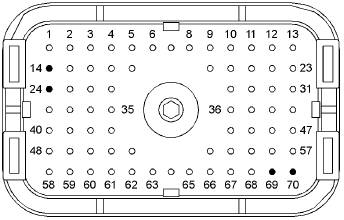
(14)旁通阀返回
(24)旁通阀PWM信号
(69)高压燃油泵吸气控制阀脉宽调制信号
(70)高压燃油泵吸气控制阀返回
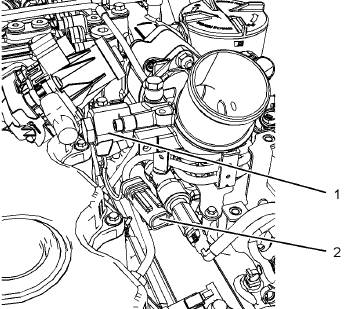
(1)典型的旁通阀调节器
(2)为旁通阀调节器连接器
perkins1204e-e44发动机高压燃油泵

(3)对吸力控制电磁阀(SCV)
perkins1206e-e66发动机高压燃油泵
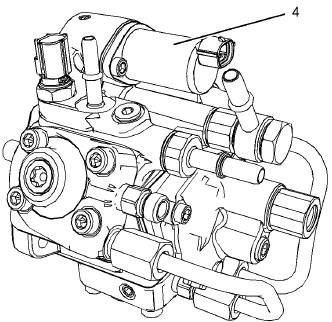
(4)对吸力控制电磁阀(SCV)
Test Step 1. Inspect Electrical Connectors
and Wiring
A. Thoroughly inspect the connectors for the solenoid
valves. Refer to Troubleshooting, “Electrical
Connectors - Inspect” for details.
B. Perform a 45 N (10 lb) pull test on each wire that
is associated with the solenoid valves.
C. Check the screw for the ECM connector for the
correct torque of 6 N·m (53 lb in).
Expected Result:
Results:
• All connectors, pins, and sockets are correctly
connected and the harness is free of corrosion,
abrasion, and pinch points – Proceed to Test Step
2.
• There is a fault in the connectors and/or the
harness.
Repair: Repair the connectors or the harness
and/or replace the connectors or the harness.
Ensure that all of the seals are correctly in place
and ensure that the connectors are correctly
connected.
Use the electronic service tool in order to clear all
logged diagnostic codes and then verify that the
repair eliminates the fault.
STOP.
Test Step 2. Check for Diagnostic Codes
A. Turn the keyswitch to the OFF position.
B. Connect the electronic service tool to the
diagnostic connector.
C. Turn the keyswitch to the ON position.
D. Monitor the electronic service tool for active
diagnostic codes and/or logged diagnostic codes.
Results:
• An XXXX-5 diagnostic code is active or recently
logged – Proceed to Test Step 3.
• An XXXX-6 diagnostic code is active or recently
logged – Proceed to Test Step 4.
• No Codes – The fault seems to be resolved.
Repair: For intermittent faults, refer to
Troubleshooting, “Electrical Connectors - Inspect”.
STOP.
Test Step 3. Create a Short Circuit at the
Solenoid Connector
A. Turn the keyswitch to the OFF position.
B. Disconnect the connector for the suspect solenoid.
C. Fabricate a jumper wire. Install the wire between
the two pins on the connector for the suspect
solenoid in order to create a short circuit.
D. Turn the keyswitch to the ON position. Check for
active diagnostic codes on the electronic service
tool.
E. Remove the jumper wire from the connector for
the solenoid valve.
Results:
• Diagnostic code XXXX-6 is active when the jumper
wire is installed – There is a fault in the solenoid.
Repair: Perform the following procedure:
1. Temporarily connect a replacement for the
suspect component to the harness.
2. Turn the keyswitch to the ON position. Use
the electronic service tool in order to check
for active diagnostic codes. Wait at least
3. If the fault is eliminated, reconnect the suspect
component. If the fault returns, permanently
install the replacement component. Refer to
Disassembly and Assembly for the correct
procedure.
STOP.
• An XXXX-5 diagnostic code is still active with the
jumper installed – Proceed to Test Step 5.
Test Step 4. Disconnect the Solenoid in
order to Create an Open Circuit
A. Turn the keyswitch to the OFF position.
B. Disconnect the connector for the suspect solenoid
in order to create an open circuit.
C. Turn the keyswitch to the ON position. Check for
active diagnostic codes on the electronic service
tool. Wait at least 30 seconds in order for the
codes to be displayed.
Results:
• An XXXX-5 diagnostic code is now active – There
is a short in the solenoid.
Repair: Perform the following procedure:
1. Temporarily connect a replacement for the
suspect component to the harness.
2. If the fault is eliminated, reconnect the suspect
component. If the fault returns, permanently
install the replacement component. Refer to
Disassembly and Assembly for the correct
procedure.
STOP.
• Not OK – There is still an XXXX-6 diagnostic code.
Proceed to Test Step 5.
Test Step 5. Bypass the Engine Wiring
Harness
A. Turn the keyswitch to the OFF position.
B. Disconnect the P2 connector and the connector
for the suspect solenoid.
C. Remove the signal wire for the suspect solenoid
from the P1/P2 connector.
D. Remove the signal wire from the connector for the
suspect solenoid.
E. Fabricate a jumper wire that is long enough to
reach from the ECM to the connector for the
suspect solenoid with sockets on both ends.
F. Insert one end of the jumper into the plug for
the signal wire on the P2 connector. Insert the
other end of the jumper into the connector for the
suspect solenoid.
G. Reconnect the P2 connector and the connector
for the solenoid.
H. Turn the keyswitch to the ON position.
I. Use the electronic service tool in order to monitor
the “Active Diagnostic Code” screen. Monitor for
either the open circuit diagnostic code for the
suspect solenoid or the short circuit diagnostic
code for the suspect solenoid.
J. Remove the jumper and reconnect the wires that
were previously removed.
K. Reconnect the P2 connector and the connector
for the suspect solenoid.
Results:
• The diagnostic code disappears when the jumper
is installed – There is a fault in the wiring harness.
Repair: Perform the following repair:
1. Repair the faulty harness or replace the faulty
harness.
2. Use the electronic service tool in order to clear
all logged diagnostic codes and then verify that
the repair eliminates the fault.
STOP.
• The diagnostic code is still present with the jumper
installed
Repair: Perform the following repair:
1. Make sure that the latest flash file for the
application is installed in the ECM. Refer to
Troubleshooting, “Flash Programming”.
2. Contact Perkins Global Technical Support.
Note: This consultation can greatly reduce the repair
time.
3. If Perkins Global Technical Support recommend
the use of a test ECM, install a test ECM. Refer
to Troubleshooting, “Replacing the ECM”.
4. Use the electronic service tool to recheck the
system for active diagnostic codes.
5. If the fault is resolved with the test ECM,
reconnect the suspect ECM.
6. If the fault returns with the suspect ECM,
replace the ECM.
7. Use the electronic service tool in order to clear
all logged diagnostic codes and then verify that
the repair eliminates the fault.


合作伙伴


 Deutsch
 Espaol
 Franais
 Italiano
 Português
 日本
日本 韩国
韩国 阿拉伯
阿拉伯 български
 hrvatski
 esky
esky Dansk
Dansk Nederlands
 suomi
suomi Ελληνικ
 印度
印度 norsk
norsk Polski
 Roman
Roman русский
 Svenska
 中文(简)
中文(简)