 English
 Espaol
 Franais
 阿拉伯
阿拉伯 中文(简)
中文(简) Deutsch
 Italiano
 Português
 日本
日本 韩国
韩国 български
 hrvatski
 esky
esky Dansk
Dansk Nederlands
 suomi
suomi Ελληνικ
 印度
印度 norsk
norsk Polski
 Roman
Roman русский
 Svenska
帕金斯柴油机活塞和连杆组件维修的安装方法
帕金斯柴油机活塞和连杆组件维修的安装方法
Pistons and connecting rod assemblies
2800
To remove and to fit
Special requirements
Operation 4-
To remove
Remove the cylinder head assembly, Operation -5.
2 Remove the oil pump, Operation 0.
Anti-seize compound
CV60890
Remove the stiffener plate from the base of the crankc ase.
4 Remove the carbon ridge from the top inside surface of the cylinder liners.
5 Turn the crankshaft until two pistons are at bottom centre.
6 Remove the bolts (A) and the bearing caps. Push the connecting rods and pistons up until the rings are
free from the cylinder liners.
7 Withdraw carefully the pistons and connecting rods from the cylinder liners. Store the bearing caps with their
relev ant connecting rods.
8 Repeat steps to 6 for the remainder of the pistons and connecting rods.
![]() 2800
2800
To fit
Apply clean engine oil to the piston rings, the connecting rod bearings and the cylinder liners.
2 Ensure that the piston ring gaps are set at 20 degree intervals to each other.
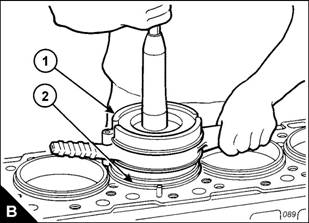
Use the special tool (B), GE5000 for 2806 engines or GE50045 for 206 engines , to install the piston and
the connecting rod in the cylinder liner (B2). The connecting rod must be fitted with tab groove side of the big
end bearing at the opposite s ide to the camshaft. Proceed with care to ensure that the piston rings are not
damaged during the operation.
Caution: Bearing caps must be fitted to their original connecting rods,
4 Fit the bearing cap to the connecting rod. The cap must be fitted with its number on the same s ide as that
on the connecting rod and the number must be the same.
5 Apply anti-seize compound, CV60890, to the bolt threads. Install the bolts and bearing cap. Tighten each
bolt in the bearing cap to a torque of 90 +/- 8 Nm (66 +/- 6 lbf ft). Make a temporary mark on each bolt and the
bearing cap, then tighten each bolt by an additional 90 +/- 5 degrees.
6 Repeat steps to 4 for the remainder of the pistons and connecting rods.
7 Fit the stiffener plate to the base of the crankcase.
8 Fit the oil pump, Operation 0.
9 Fit the cylinder head assembly, Operation -5.
 4
4
2800
To dismantle and assemble
To dismantle
Remove the pistons and connecting rod assemblies, Operation 4-.
Operation 4-2
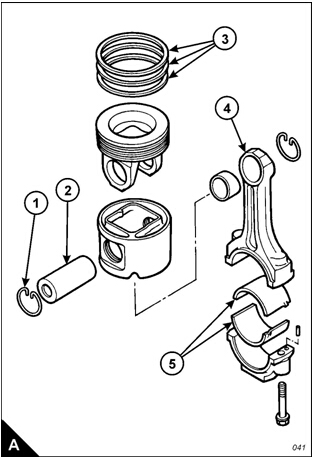
2 Remove the big-end bearing shells (A5) from the connecting rod (A4) and connecting rod cap. If the bearings
are to be used again, make a note of the position where they were fitted.
Remove the circlips (A).
4 Remove the gudgeon pin (A2) and separate the connecting rod and the piston crown from the piston.
5 Remove carefully the piston rings (A) from the piston crown and clean the piston ring grooves with a
suitable cleaning tool.
Special equipment is required to renew the small end bearing. If this operation becomes necessary, contact
your Perkins dealer.
2800
To assemble
Check the gaps between the ends of the piston rings when the rings are inserted in a new liner. The rings
can also be c hecked by insertion in an unworn part of a used liner.
For the correct dimensions refer to Chapter 2, Specific ations.
2 Fit the spring of the oil control ring to its groove in the piston crown.
Note: The oil control ring must be fitted over the spring with the gap of the oil control ring at 80 degrees from
the joint of the spring.
Use a suitable piston ring expander to fit the oil control ring to its groove in the piston crown.
4 Fit the second (intermediate) piston ring with the side that has the identification "UP-2" toward the top of the
piston. Use a suitable piston ring expander.
5 Fit the first (top) piston ring with the side that has the identification "UP-" toward the top of the piston. Use
a suitable piston ring expander.
6 When all three piston rings have been fitted, adjust the position of the piston ring gaps so that they are
20 degrees apart.
7 Fit the piston crown into the piston skirt and insert the connec ting rod. Apply clean engine oil to the gudgeon
pin (A2) and install the pin. Fit the circlips (A). Ensure that the circlips are located fully in the grooves of the
piston.
8 Fit the big-end bearings to the connecting rod (A4) and connecting rod cap. If the original bearings are to be
used, ensure that they are fitted to their original positions.
Note: The tabs at back of the bearings must be located correctly in the tab slots of the connec ting rod and
connecting rod cap.
9 Fit the pistons and connecting rod assemblies, Operation 4-.
帕金斯活塞环和轴承,帕金斯机油格,韩国大宇发电机配件,perkins起动机2873k059,帕金斯发电机ECM板价格,三凌柴油机起动马达,帕金斯1104c p4ta发动机配件,北京威尔信发电机组配件,帕金斯机器配件哪卖,进口珀金斯发动机配件,perkins 2614b562皮带,沃尔沃遍达TDW1641GE发动机配件,perkins 4006 气门 ,perkins发电机p30E1滤清器,三菱发电机S12A2配件,帕金斯柴油发电机组配件,威尔信 P635E1配件,Perkins4008TAG 2的配件,Perkins 过滤器,三菱柴油发动机活塞环,六缸帕金斯发动机配件,无锡帕金斯1104d发动机配件,P110E英国威尔信350KW配件,帕金斯2645A747喷油器
400-100-8969 15088860848
0574-26871589 15267810868
0574-26886646 15706865167
0574-26871569 18658287286
