 English
 Espaol
 Franais
 阿拉伯
阿拉伯 中文(简)
中文(简) Deutsch
 Italiano
 Português
 日本
日本 韩国
韩国 български
 hrvatski
 esky
esky Dansk
Dansk Nederlands
 suomi
suomi Ελληνικ
 印度
印度 norsk
norsk Polski
 Roman
Roman русский
 Svenska
Perkins柴油发动机3008摇臂室总成的技术资料
Perkins柴油发动机3008摇臂室总成的技术资料
Rocker boxes
To remove and to fit
To remove
12-4
2 Fit a new gasket to the correct position and fit the
rocker box. Fit the setscrews and cap screws of the
rocker box and ensure that the spherical ends of the
roc ker screws are correctly fitted in the sockets of the
push rods .
3 Tighten the setscrews and cap screws evenly until
the correct torque load is obtained.
1 Disconnect and remove the relevant air cleaner,
operation 18-1, and high pressure fuel pipes.
2 Remove the leak-off pipes from the fuel injectors on
the relevant bank and then remove the rocker box
cover.
3 Remove the connectors, for leak-off fuel, from the
fuel injectors.
4 Loosen the adjustment screws of the rockers.
5 Loosen the setscrews and the screws with socket
heads. The pressure of the valve springs will lift the
rock er box away from the cylinder head.
6 Remove the setscrews and cap screws and remove
the rocker box (A).
To fit
1 Ensure that the joint face of the cylinder head is
clean and fit the dowels for the rocker box.
4 Set the tappet clearances, page 39. Fit the
connectors for the leak-off to the fuel injectors,
through the sides of the rocker box, complete with
new sealing washers. Tighten to the correct torque
load.
5 Before the rocker cover is fitted, inspect the 'O' ring
seals for the fuel injectors and renew them if
necessary.
6 Fit a new gasket to the top face of the rocker box,
fit the rocker box cover and setscrews and tighten to
the correct torque load.
The rocker covers of some engines are retained by
ten setscrews and a two nuts.
7 Fit the leak-off pipes.

8 Fit the high pressure fuel pipes, complete with
rubber dampers and shrouds, between the fuel
injection pump and the fuel injectors. Tighten the pipe
connections at the fuel injectors and at the fuel
injection pump to the relevant torque: Engines fitted
with the Bosc h S7100 fuel injection pump, tighten to a
torque of 45 Nm (33 lbf ft). Engines fitted with the
Bosch S3000 fuel injection pump, tighten to a torque
of 25 Nm (15 lbf ft).
9 Ensure that there is no distortion of the high
pressure pipes during this operation.
10 Fit the relevant air cleaner assembly, operation
18-1.
To dismantle and to assemble
To dismantle
12-5
5 If relevant, check that the bore for the cup plug in
the end of the rocker box is clean. Apply 'Loctite 542'
to a new cup plug and press the cup plug into the
rocker box until it is aligned precisely with the wall.
1 If a cup plug is fitted to the bore of the rocker shaft,
it must be removed.
2 Remove the screw that provides the location for the
rocker shaft. Push the rocker shaft in one direction
enough to remove one of the 'O' ring seals from the
end of the shaft. Push the shaft in the other direction
to release the 'O' ring seal from the opposite end.
Continue to withdraw the shaft and remove the rocker
levers and the springs as they become free.
To assemble
1 If relevant, check that the bore for the cup plug in
the end of the rocker box is clean. Apply 'Loctite 542'
to a new cup plug and press it into the bore until it is
aligned with the wall of the rocker box.
2 Apply clean engine lubricating oil to the rocker shaft
and insert the end which has the opening into the bore
of the rocker box. Ensure that the direction of the oil
hole in the rocker shaft is downward (toward the
cylinder head).
3 Push the rocker shaft through the end, enough to fit
the first rocker lever onto the rocker shaft. Continue to
push the rocker shaft through the rocker box and fit
the spring and the second rocker lever before the
rocker shaft enters the first pedestal. Fit the
remainder of the arms and springs in the correct
sequence.
4 Before the rocker shaft is pushed fully into its
correct position, fit the 'O' ring in its groove around the
rocker shaft. Push further the rocker shaft until the
bolt hole in the rocker shaft is aligned with the
threaded hole in the pedestal. Fit the bolt that holds
the rocker shaft, with a plain washer and a spring
washer, and tighten it securely.
6 For rocker boxes which do not have a cup plug in
the bore, insert the shaft into the bore from either end.
Ensure that the oil hole in the rocker shaft is directly
downward (toward the cylinder head). Fit the rocker
levers and the springs in the correct sequence and,
before the rocker shaft is fully into its correct position,
fit a new 'O' ring in the groove around the outer end of
the rocker shaft.
7 Push carefully the rocker shaft through the bore
until the groove at the opposite end is just away from
the wall at the end of the rocker box. Fit the second 'O'
ring and press backward the shaft until the bolt hole in
the rocker shaft is aligned with the threaded hole in
the pedestal. Fit the bolt that holds the rocker shaft,
with a plain washer and a spring washer, and tighten
it securely.
To inspect and to correct
1 Remove all of the grease and dirt from the
12-6
components by the use of a cleaning fluid which can
be diluted with water. Wash and dry each item before
inspection.
2 Inspect the rocker shaft for wear or damage around
the locations of the rocker levers. If wear is seen,
renew the shaft.
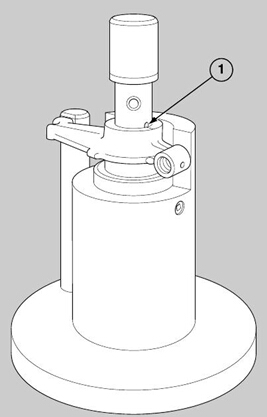
3 Fit each rocker lever onto the shaft and check the
clearance in the bush of the rocker lever. If the
clearance is excessive, make locally a suitable tool as
shown (A) to press out the bush. Make an accurate,
temporary, mark on the rocker lever to indicate the
position of the small cut-out in the end of the bush and
then press out the bush.
4 Check the bore of the rocker lever for deep
scratches or other damage.
5 If the condition of the rocker lever is acceptable, the
same tool with suitable modifications, similar to the
illustration (B), can be used with a press to fit a new
bush into the roc ker lever. Ensure that the cut-out in
the new bush (B1) aligns exactly with the temporary
mark on the rocker lever. If it does not, press out the
bush and try again. When the operation is finished,
make a final check that the oil holes in the bush are
aligned with the passages in the rocker lever. New
bushes are pre-finished and do not need to be
reamed.
6 Use a fine oilstone to remove small grooves and
scratches and to make a s mooth surface on the pads
of the rocker levers. Ensure that the surface of the
pad is seen to be parallel to the bore by the use of the
roc ker shaft and a straight edge.

400-100-8969 15088860848
0574-26871589 15267810868
0574-26886646 15706865167
0574-26871569 18658287286
