 English
 Espaol
 Franais
 阿拉伯
阿拉伯 中文(简)
中文(简) Deutsch
 Italiano
 Português
 日本
日本 韩国
韩国 български
 hrvatski
 esky
esky Dansk
Dansk Nederlands
 suomi
suomi Ελληνικ
 印度
印度 norsk
norsk Polski
 Roman
Roman русский
 Svenska
约翰迪尔John Deere拖拉机6081HRW活塞和连杆拆卸步骤衬套、活塞和连杆磨损划伤的原因
约翰迪尔John Deere拖拉机6081HRW活塞和连杆拆卸步骤衬套、活塞和连杆磨损划伤的原因
约翰迪尔John Deere柴油机活塞磨损或划伤:
•定期保养不当。
•恶劣的操作条件。
•过热。•冷却液泄漏到曲轴箱中。
•加油过量。•缸套锥度过大。
•润滑不足。

•冷却不足。杂色、灰色或点状压缩环:
•约翰迪尔John Deere柴油机活塞与缸套间隙不当。
•冷却液泄漏到曲轴箱中。•内部冷却液泄漏。
•约翰迪尔John Deere柴油机连杆未对准或弯曲。
•约翰迪尔John Deere柴油机活塞安装不当。暗缎面和精细的垂直划痕
•低油位。环:
•操作不当。
•约翰迪尔John Deere柴油机连杆轴承间隙不正确。•进气系统中的污垢和磨料。
•环槽中的积碳。
•强鹿约翰迪尔John Deere柴油发动机磨合不当。活塞销和卡环故障:
•约翰迪尔John Deere柴油机活塞磨损。
•受油污染。•连杆未对准。
•约翰迪尔John Deere柴油机气缸套变形。•曲轴端隙过大。
•活塞冷却孔堵塞。•卡环不正确。
•通过进气口吸入灰尘。
连杆断裂:压缩环磨损或断裂:
•约翰迪尔John Deere柴油机活塞与缸套间隙不足。
•润滑不足。•连杆轴承磨损。
•冷却不足。•气缸管路变形。
•约翰迪尔John Deere柴油机环安装不当。•活塞销故障。
•时机不当。
•燃烧室内的磨料。气缸套磨损和变形:机油控制环堵塞:
•压缩环安装不正确。
•润滑不足。
•不适当的油。•衬里周围冷却不均匀。
•过度窜气。•活塞与缸套间隙不足。
•受油污染。•缸套孔损坏。
•不适当的定期服务。
•低工作温度。翘曲气缸体:
卡环:
•冷却不足。
•油分类不当。
约翰迪尔John Deere柴油机连杆一般信息
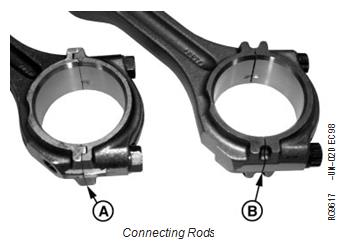
早期的强鹿约翰迪尔John Deere柴油发动机在连杆和盖(A)之间有传统的榫槽。后来的强鹿约翰迪尔John Deere柴油发动机有精密接头 杆和盖(B)。
创建精密关节的步骤, 用激光束在连杆上刻槽。然后,为杆孔中的精密心轴提供动力,以在接头(C)处将盖与杆分离。
两种类型的杆都提供了牢固的连接。拆卸和安装类似,但存在差异,包括带帽螺钉的不同扭矩规格。请参阅“检查杆和盖”和“安装活塞”以及该组中的连杆。
重要事项:更换相同类型的杆。不要将榫舌和凹槽与精密接头混合 同一台强鹿约翰迪尔John Deere柴油发动机中的连杆。有关建议,请参见零件目录。
A型榫槽杆(早期强鹿约翰迪尔John Deere柴油发动机)B型精密接头 连杆(后来的强鹿约翰迪尔John Deere柴油发动机)C型精密接头 细节
拆下活塞和连杆组件

必须从8100-8400和8110-8410拖拉机上拆下6081HRW强鹿约翰迪尔John Deere柴油发动机,以维修活塞和连杆。有关强鹿约翰迪尔John Deere柴油发动机拆卸步骤,请参阅机器技术手册TM1575(维修)。(对于8000吨履带拖拉机,请参阅TM1621。)
重要事项:更换相同类型的杆。不要将榫舌和凹槽与精密接头混合 同一台强鹿约翰迪尔John Deere柴油发动机中的连杆。有关建议,请参见零件目录。
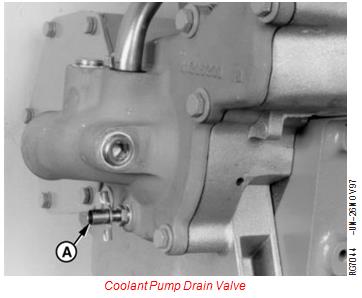
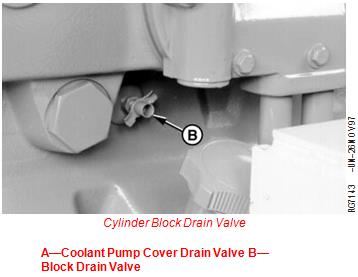
警告:在强鹿约翰迪尔John Deere柴油发动机冷却液冷却到工作温度以下之前,不要排放强鹿约翰迪尔John Deere柴油发动机冷却液。然后缓慢松开冷却液泵盖排放阀(A)和阻塞排放阀(B),以释放任何压力。
排放冷却液和强鹿约翰迪尔John Deere柴油发动机机油。
重要事项:必须打开两个排放阀以完全排放强鹿约翰迪尔John Deere柴油发动机缸体。
1.排空所有强鹿约翰迪尔John Deere柴油发动机冷却液和强鹿约翰迪尔John Deere柴油发动机机油。
注意:如果要完全拆卸强鹿约翰迪尔John Deere柴油发动机,请参见第010组中的强鹿约翰迪尔John Deere柴油发动机拆卸顺序。
2.拆下气缸盖。请参见组020中的拆卸气缸盖序列号(-199999),或参见组021中的拆卸缸盖序列号(200000-)。
3.拆下油底壳和油泵。请参见组060中的拆卸强鹿约翰迪尔John Deere柴油发动机机油泵。
冷却液泵排放阀
气缸体排放阀
A-冷却液泵盖排水阀B-隔断排水阀
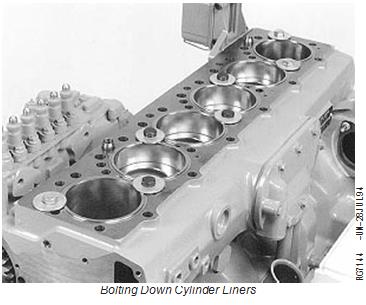
重要事项:除非衬套用螺栓固定,否则不要在拆下气缸盖的情况下旋转曲轴。拆下活塞前,用螺栓固定衬套。
带帽螺钉和垫圈必须拧紧至以下规格:
在测量衬垫突出物(块上方的高度)时实现精确读数。参见测量气缸套突出量(气缸体上方的高度),
在这个组的后面。
4.使用9/16-18带帽螺钉,约51 mm(2.0英寸)长和5/8英寸。一、 D.1-3/4英寸。O、 D.x 3.18 mm(1/8 in.)厚垫圈,用于将气缸套固定在
七个位置如图所示。拧紧带帽螺钉以固定气缸套
规格。
规格
气缸套带帽螺钉(用于检查支架)-扭矩…68牛•米(50磅-英尺)
下一页继续RG,RG347101113-19-08JUN99-2/5
重要事项:不要使用气动扳手拧紧连杆带帽螺钉。使用气动扳手可能会导致螺纹损坏。
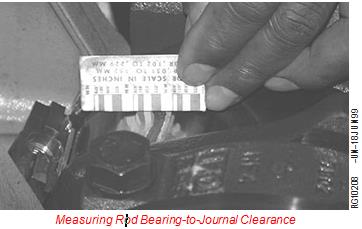
保持轴承镶块带有各自的杆和盖。标记杆、活塞和盖,以确保在拆卸时的相同位置正确组装。
7.拆下带轴承(B)的杆帽螺钉和杆帽(A)。
A- 杆盖B-轴承
曲轴显示为已拆下,但活塞和连杆组件可以在安装曲轴的情况下拆下。
重要事项:拆卸活塞和连杆组件时,小心不要让连杆划伤曲轴轴承表面。
如果要重复使用衬套,在拆卸活塞和连杆组件时,要格外小心,不要让连杆碰到衬套孔。
拆卸活塞
活塞和衬套选择性地安装到A型活塞上
保持活塞与衬套之间的间隙。
始终将匹配的活塞和缸套作为一组放在一起,每组必须安装在拆下的同一气缸中。
8.从底部通过缸体顶部轻轻敲击活塞(A)。一旦活塞环清除缸套孔,抓住活塞以防止活塞掉落。
Preliminary Liner, Piston, and Rod Checks
Scuffed or Scored Pistons: • Improper periodic service.
• Poor operating conditions.
• Overheating. • Coolant leakage into crankcase.
• Overfueling. • Excessive cylinder liner taper.
• Insufficient lubrication.
• Insufficient cooling. Mottled, Grayish or Pitted Compression Rings:
• Improper piston-to-liner clearance.
• Coolant leakage into crankcase. • Internal coolant leaks.
• Misaligned or bent connecting rod.
• Improperly installed piston. Dull Satin Finish and Fine Vertical Scratches on
• Low oil level. Rings:
• Improper operation.
• Incorrect connecting rod bearing clearance. • Dirt and abrasives in air intake system.
• Carbon build-up in ring groove.
• Improper engine break-in. Piston Pin and Snap Ring Failure:
• Worn piston.
• Contaminated oil. • Misaligned connecting rod.
• Distorted cylinder liner. • Excessive crankshaft end play.
• Plugged piston cooling orifice. • Incorrect snap rings.
• Ingestion of dust through air intake.
Broken Connecting Rod:
Worn or Broken Compression Rings:
• Inadequate piston-to-liner clearance.
• Insufficient lubrication. • Worn connecting rod bearing.
• Insufficient cooling. • Distorted cylinder line.
• Improper ring installation. • Piston pin failure.
• Improper timing.
• Abrasives in combustion chamber. Cylinder Liner Wear and Distortion:
Clogged Oil Control Ring: • Incorrectly installed compression rings.
• Insufficient lubrication.
• Improper oil. • Uneven cooling around liner.
• Excessive blow-by. • Inadequate piston-to-liner clearance.
• Contaminated oil. • Liner bore damage.
• Improper periodic service.
• Low operating temperature. Warped Cylinder Block:
Stuck Rings: • Insufficient cooling.
• Improper oil classification.
Connecting Rods—General Information
Earlier engines have the traditional tongue-and-groove between the connecting rod and cap (A). Later engines have the Precision Joint rod and cap (B).
To create the Precision Joint, the connecting rod is notched with a laser beam. Then a precision mandrel in the rod bore is powered to separate the cap from the rod at the joints (C).
Both types of rods provide a strong joint. Removal and installation is similar, with differences noted, including different torque specifications for cap screws. See INSPECT ROD AND CAP and see INSTALL PISTON
AND CONNECTING ROD later in this Group.
IMPORTANT: Replace rods with the same type. Do Not mix tongue-and-groove with Precision Joint rods in the same engine. See parts catalog for recommendations.
A—Tongue-and-Groove Rod (Early Engines) B—Precision Joint Rod (Later Engines) C—Precision Joint Details
Remove Pistons and Connecting Rod Assemblies
6081HRW Engines must be removed from 8100-8400 and 8110-8410 Tractors to service the pistons and connecting rods. Refer to machine technical manual TM1575 (Repair) for engine removal procedure. (For 8000T Tracks Tractors, refer to TM1621.)
IMPORTANT: Replace rods with the same type. Do Not mix tongue-and-groove with Precision Joint rods in the same engine. See parts catalog for recommendations.
CAUTION: Do not drain engine coolant until it cools below operating temperature. Then slowly loosen coolant pump cover drain valve (A) and block drain valve (B) to relieve any pressure.
Drain coolant and engine oil.
IMPORTANT: Both drain valves must be opened to completely drain engine block.
1. Drain all engine coolant and engine oil.
NOTE: If engine is to be completely disassembled, see ENGINE DISASSEMBLY SEQUENCE in Group 010.
2. Remove cylinder head. See REMOVE CYLINDER HEAD SERIAL NUMBER ( —199,999) in Group 020, or see REMOVE CYLINDER HEAD SERIAL NUMBER (200,000— ) in Group 021.
3. Remove oil pan and oil pump. See REMOVE ENGINE OIL PUMP in Group 060.
Coolant Pump Drain Valve
Cylinder Block Drain Valve
A—Coolant Pump Cover Drain Valve B—Block Drain Valve
IMPORTANT: Do not rotate crankshaft with cylinder head removed unless liners are bolted down. Bolt liners down before removing piston.
Cap screws and washers must be tightened to the following specifications
to achieve an accurate reading when measuring liner standout (height above block). See MEASURE CYLINDER LINER STANDOUT (HEIGHT ABOVE BLOCK),
later in this group.
4. Use 9/16-18 cap screws, approximately 51 mm
(2.0 in.) long and 5/8 in. I.D. 1-3/4 in. O.D. x 3.18 mm (1/8 in.) thick washers to bolt down cylinder liners in
the seven locations as shown. Tighten cap screws to Bolting Down Cylinder Liners
specifications.
Specification
Cylinder Liner Cap Screws (For
Checking Standout)—Torque ... 68 N•m (50 lb-ft)
Continued on next page RG,RG34710,1113 –19–08JUN99–2/5
IMPORTANT: DO NOT use pneumatic wrenches to tighten rod cap screws. Using pneumatic wrenches may cause thread damage.
Keep bearing inserts with their respective rods and caps. Mark rods, pistons, and caps to insure correct assembly in same location as removed.
7. Remove rod cap screws and rod caps (A) with bearings (B).
A—Rod Caps B—Bearings
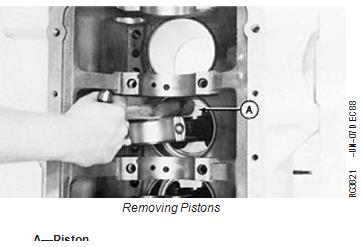
Crankshaft is shown removed, but piston and rod assembly can be removed with crankshaft installed.
IMPORTANT: Be careful not to let rod nick crankshaft bearing surface as piston and rod assembly is removed.
If liners are to be reused, be extremely careful not to let connecting rod hit liner bore when removing piston and rod assembly.
Removing Pistons
Piston and liners are selectively fitted to A—Piston
maintain piston-to-liners clearance.
Always keep matched pistons and liners together as a set and each set MUST BE installed in the same cylinder as removed.
8. Gently tap piston (A) through top of cylinder block from the bottom. Once piston rings have cleared cylinder liner bore, hold on to piston to prevent piston from dropping.
约翰迪尔5000系列拖拉机在中国的第一位用户郑宝森已经是约翰迪尔的老用户了,他家承包了1000亩土地,种植玉米和葵花,同时还在周围的农场作业。他家的拖拉机每年使用时间是大多数地区的3倍以上,每台拖拉机的年纯收入达8~10万元,从事农机服务12年的郑宝森已经使用过6台迪尔拖拉机,说起他新购买的JD5-854,郑宝森的喜悦心情溢于言表:“我第一眼看到这车,真是喜欢,底盘高了,前轮宽了。干起活来强鹿约翰迪尔John Deere柴油发动机特别有劲,挡位的设置非常合理。”佛山Perkins2806S-E15强鹿约翰迪尔John Deere柴油发动机多小钱电话,大同Perkins帕金斯1103D-33TA强鹿约翰迪尔John Deere柴油发动机高压油泵、油泵组件一台多少钱,抚顺Perkins帕金斯4012-46TAG3A强鹿约翰迪尔John Deere柴油发动机上下大修包一般多少钱,泉州Perkins帕金斯2206D-E13TAG3强鹿约翰迪尔John Deere柴油发动机曲轴瓦、连杆瓦、大小瓦企业,巴彦淖尔Perkins帕金斯403D-15T强鹿约翰迪尔John Deere柴油发动机启动马达费用报价单,湖南Perkins帕金斯1106D-E70TAG3强鹿约翰迪尔John Deere柴油发动机高压油泵、油泵组件费用报价单,盘锦Perkins帕金斯4012-46TAG3A强鹿约翰迪尔John Deere柴油发动机皮带哪里有,攀枝花卡特C18强鹿约翰迪尔John Deere柴油发动机原厂配件费用,长治Perkins帕金斯1104C-TG3强鹿约翰迪尔John Deere柴油发动机缸体多少钱,锡林郭勒Perkins帕金斯4006-23TAG3A强鹿约翰迪尔John Deere柴油发动机油水分离器大概的价钱,很多乡亲都来观摩郑宝森的新车,他们担心JD5-854的后桥是否单薄了一些,郑宝森向他们解释说:“后桥是进口的,体积不需要那么大,车的性能已经得到多年的成功验证,而且我开车干活的时候,后桥一点异常的响声也没有。”
内蒙赤峰市翁牛特旗大兴农场的何宝胜也是提前交定金的用户之一,JD5-854是他购置的第二台拖拉机,他的购车理念是:要买就买个质量过关、经久耐用的拖拉机。他认为约翰迪尔5000系列拖拉机的后桥和变速箱的质量很过关,驾驶也很舒服的。用他的一句话形容,那就是“值了”。约翰迪尔5000系列拖拉机在中国市场热销的原因,首先是马力段设置合理,该系列目前在中国市场覆盖的75、80、85马力是拖拉机市场的主力机型,同时价位合理,性价比优势非常明显。
400-100-8969 15088860848
0574-26871589 15267810868
0574-26886646 15706865167
0574-26871569 18658287286
